Tinyduino(타이니두이노) - 02. 기본 개발 환경 셋업
타이니두이노 개발 환경 셋팅을 해야 해서 찾아보고 기본 환경 셋팅하여 공유 합니다.
기본적인 setup에 대한 사항은 아래 싸이트에서 보고 따라하시면 문제없이 될듯하네요.
https://tiny-circuits.com/learn/tinyduino-setup
Step 1: Download the Arduino Environment from:http://arduino.cc/en/main/softwareand extract the files
첫번째 : 아두이노 싸이트에서 개발 환경 SDK를 받습니다.
Step 2: Unpack your TinyDuino – you should have something that looks like this:
두번째 : 타이니두이노 준비
Step 3: Connect the TinyDuino Processor Board to the TinyDuino USB & ICP Board
세번째 : 타이니두이노 USB 보드 연결
Step 4: Connect the TinyDuino to your computer via a micro-USB cable
네번째 : 타이니두이노를 컴퓨터와 USB로 연결합니다.
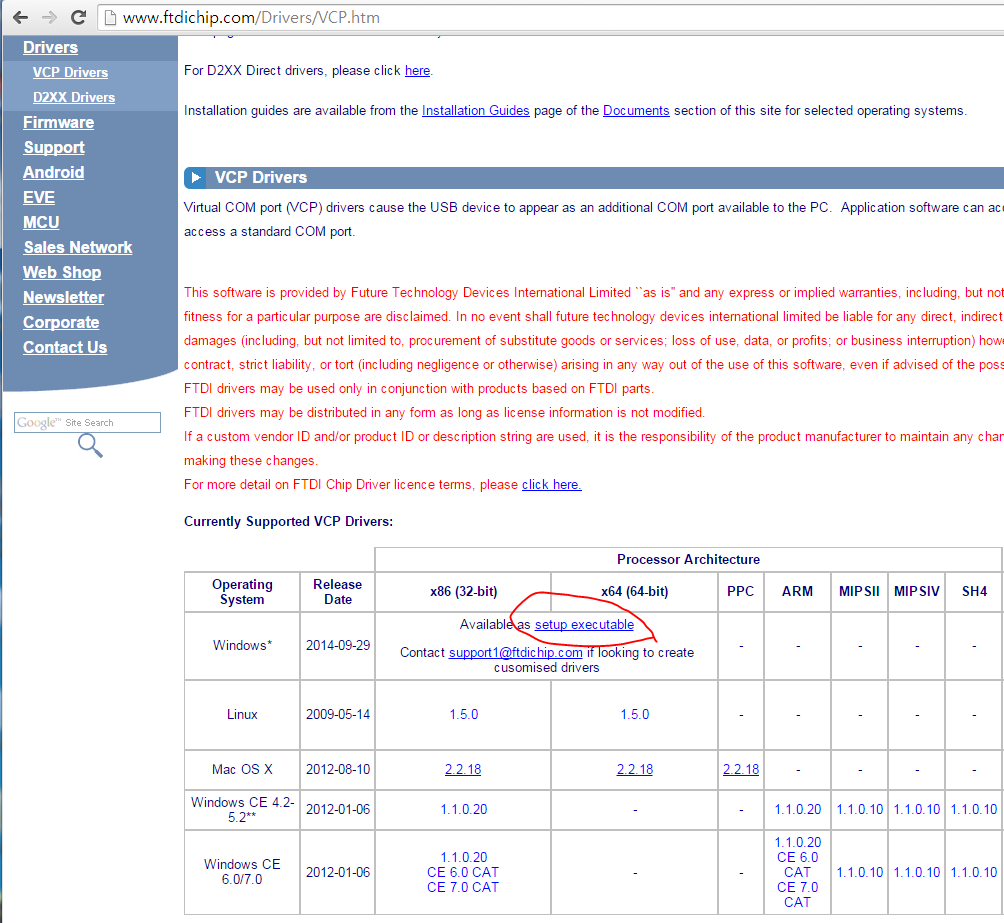
Step 5: Install the drivers for the FTDI chip:http://www.ftdichip.com/Drivers/VCP.htm
다섯번째 : USB drvier 설치를 합니다.
아래 빨간색 부분을 클릭하셔서 관리자 권한으로 설치하시면 됩니다. ^^
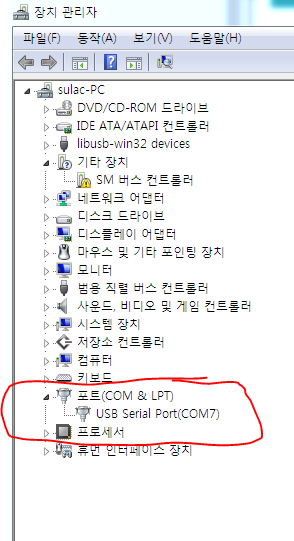
설치후 보면 아래와 같이 serial port가 연결된것을 확인할수 있습니다.
Step 6: Launch the Arduino Environment
여섯번째 : PC에서 아두이노 SDK를 실행합니다.
Step 7: Navigate to Tools > Board and select the Arduino Pro or Pro Mini (3.3V, 8MHz).
Remember, the TinyDuino is 8MHz, not 16MHz!
일곱번째 : 보드를 셋팅합니다.
Step 8: If you like, you can run a test program by navigating to File > Examples > 01. Basics > Blink
여덟번째 : 블링크 예제를 열어서 빌드합니다.
Step 9: Select your serial port by navigating to Tools > Serial Port (on Windows, most likely COM3 or higher – on MAC, something like tty.usbserial-XXX…)
아홉번째 : serial port를 찾아서 셋팅후(저의 경우는 위에서 보셨듯이 COM7번입니다.) 빌드 다운로드 합니다.\